Lunes, Disyembre 3, 2012

Battle Mode Guide by Sinjid

Battlemode Guide

The Basics

-What is Battlemode?
Battlemode is a shortcut to access your extra skills, equipments, or consumables much quicker to make PVP / BG / WoE much more efficient. The use of Battlemode aims to improve your PVP capabilities and is what separates the novices from the Pros and can be the difference between life or death out in the PVP world.

-Interface
[]Hotkeys
Hotkeys are a set of shortcut keys to allow you use the skills, consumables, or change equipment which you have assigned to a particular key by simply pressing it. Your default hotkeys are the F1-F9 keys. To access your “Hotkey bar” press F12 and you will see the following.


Posted Image

This is your “1st Hotkey bar” indicated by the 1 on the right. You are given a total of 9 “boxes” in where you decide which skills, equipments or consumables should be placed where by simply dragging the item inside the box. Going in order you will see that the F1-F9 keys correspond to the order of the boxes from left to right.

Note: The extra 2 boxes on the side are also hotkeys, but are only accessible by double clicking inside the box rather then pressing a key. If you press F12 and you’re missing these boxes, go to your RO folder, run the Setup.exe, increase the size of your resolution, go in the game press F12 drag it down to the center and you may put back your default resolution if you don’t like the big screen.
  
When you first started RO, you probably only got used to just using your default F1-F9 keys. However, with the many number of skills and items in the game you may find to want more “Hotkey bars”. This is accomplished by repeatedly pressing the F12 key, or holding and dragging down the diagonals on your 1st Hotkey bar to reveal 3 extra rows, each labeled with a corresponding number.


Posted Image

However, these extra Hotkey bars have no “key” assigned to them, meaning you would have to manually assign which keys would correspond to which box of each Hotkey bar.

First press Esc, and select “BM/Shortcut Settings”

Posted Image

You will see your default settings have the FKeys assigned to the 1st Hotkey bar. Hotkey 1-1, means it is the 1st bar, 1st box, while 1-5, means the 1st bar, 5th box. Likewise Hotkey 4-4, would mean the 4th bar, 4th box etc.

The most optimal way to assign your hotkeys is as followed. Make sure “Enable Battlemode” is checked and press “OK” after assigning new keys.

Posted Image

You are free to assign these whichever way pleases you, HOWEVER, use common sense.

D T P Q M J B Y G, is a bad 2nd Hotkey bar setup.

Rather keep it nice and flowing with subsequent letters based on the format of your keyboard.

Q W E R T Y U I O, much nicer and easier.

The following image should help clear things up in what this will do. Having assigned these “keys” to these Hotkey bars, you will be able to access the skills, equipments and consumables by merely pressing the key which corresponds to the position it belongs. While the two outside boxes are used by double clicking them.

Posted Image

To be able to use these keys you would have to enter into “Battlemode”
Posted Image

Congratulations! You are now able to use more skills, consumables, and change equipment faster than opening your inventory and manually clicking on those items.

Tips and Tricks
With your newly assigned and accessible hotkeys, you’re probably now thinking

“How do I set up my skills, consumables and equipments?”
Truth is, choosing the most effective and comfortable configuration of your Hotkeys is completely up to YOU. Everyone has different configurations and you most likely might not like it the way your friend might have his or her hotkeys set up. So how to start?

Tip #1 “Grouping”
I refer to grouping as placing similar like items/skills right next to each other, to provide an easier, efficient and organized way to remember where and what you placed on your hotkeys. Group similar like things like Undead and Holy Scrolls right next to each other, garments, shields, armors, etc.


Take my following old Hotkey bars from two of my classes, Royal Guard and Super Novice.
Posted Image

Grouping is clearly shown in both Hotkey bars, shown by the colors.
The red in both indicates Offensive like skills
The purple indicates body Armor.
The dark red indicates Garments.
The light blue indicates Buffs / Support like skills.

You can see from the other different colors where my weapons, shields and wings on RG were both grouped, while the accessories, hats and consumables were also grouped on my Super Novice. You will notice that some skills/equipments weren’t exactly “grouped” with the possible category they may belong in. This is just due to the way I felt most comfortable with the position they were in. Setting and thinking of how to set your hotkeys once again, is completely up to YOU.

Tip #2 Have a consistent similar configuration throughout your classes.

Having the same types of skills or items in the same location will help you remember what types of skills/ item go where. As shown in both my Hotkey bars, my Buffs/Support skills and Garments are almost in the exact same location while my Attack based skills tend to lean towards the 1st Hotkey bar and to the right. I got accustomed to doing this; therefore it is about the same configuration for almost all my classes.

Tip #3 Think of a mnemonic to help you remember.

A mnemonic is way to help you remember something with a method you can come up with.

For example, you will see that I have the equipment “Poring Ring” in the same position for both Hotkeys, which happens to be the Hotkey “Y”. My way of remembering that pressing Y = Poring Ring is by thinking to my self, “Y U SO FAST?!” (Meme Reference)

Other examples from my RG skill bar,
Pressing X = “Cross Shield”, hence X represents “crossing”
Pressing U.K.O = To equip U= “Golden Wings”, K = “Tao Gunka Valk”, O = “Feather Valk Helm”. Reason for this was because equipping these was my “Full Zerk Sac Damage Set”; therefore it was my intention to do as much damage to “Knock U Out” or “U Knocked Out”

Others examples
On my Sura, I used to have D = Dragon Combo, F = Fallen Empire, G= Gate of Hell, R = Rising Dragon. It was convenient at the time since Dragon and Fallen were combos you stringed, and they are right next to each other on keyboard so it was easy to remember.

For Armors
Pressing D = “Deviant” Garment (This is consistent with the positions I have my Garments in)
Pressing G = “Ghost” Armor
Pressing H = “High Risk Tao” Armor
Pressing C = “Cranial” Shield, or “Chakra”
Etc.

While some ways of remembering may seem cheesy or corny, finding a way to set up your hotkeys depends on what makes you most comfortable and easy to remember.

Tip #4 Use your hotkeys wisely. HOTKEY ONLY WHAT YOU NEED !

This is referring to the amount of skills, or items you place on your hotkeys. Note that depending on the player, not everyone may find the need to fill up their entire Hotkey bars, however you should hotkey what is needed. Only hotkey the items or skills that you actually use. If you’re finding that some skills or items are not being used, then it probably shouldn’t be hotkeyed.

Tip #5 If you’re completely new to Battlemode, start small and practice.

You are not forced to fill up your whole hotkeys, so start small. The easiest way to start is with just shield, garment, armor equipments and then practice. Go into PVP or BG and analyze your surroundings. If you see a Wizard coming towards you simply adapt to the equipments you need to best fight against the Wizard, ie switch to Maya or GTB, and Spiritual Tunic.  


Closing Statement
Battlemode was made to improve you PVP experience. It allows for much quicker and efficient use of your skills, and items to enhance your reflexes and adapt to the PVP environment to ensure the best way to survive. If you want to improve, then look no further and begin with learning how to use Battlemode.


Elite Hero Quest

Credits to OG-System for the guide.

Elite Hero Quest Guide

Qualification to be an Elite Hero


* Must have 97m+ Exp or higher
* Must be Rank B or higher


Where to Go?

1. Sign-Up to Sigmund [ayo_in02 100 165], he will then tell you if you are eligible or not
2. Talk to Lord Montagu [ayo_in02 103 167], he will then tell you to look for Sir Lancelot du Lac
3. Warp to Sir Lancelot du Lac [caspen 111 262], he will then tell you the requirements
4. After completing the Items, go back again to Sir Lancelot du Lac [caspen 111 262], he will then count your items and then he will recommend you to Lord Montagu [ayo_in02 103 167].
5. After giving the recommendation letter to Lord Montagu, he will then tell you to find Sir Lionel outside of caspen dun/indent]

Requirements to be an Elite Hero
Quantity Item Name - Dropped by Monsters (Map) [Item ID] ]

25 Biotite - Dropped by Mysteltainn (alde_dun04,gefenia01-04,gl_cast02,gl_knt02) [Item ID# 7297]

20 Muscovite - Dropped by Tirfing/Ogretooth (alde_dun04,gefenia01-04,gl_cas01,gl_cas02) [Item ID# 7292]

20 Phlogopite - Dropped by Executioner (alde_dun04,c_tower4,gefenia01-04) [Item ID# 7290]

20 Citrin - Dropped by Chimera (gl_cast02) [Item ID# 7295]

15 Rose Quartz - Dropped by Zherlthsh/Zealotus (gl_prison1) [Item ID# 7293]

15 Turquoise - Dropped by Arch Angeling (yuno_fild05) [Item ID# 7294]

15 Pyroxene - Dropped by Mutant Dragonoid (cmd_fild03,hu_fild05) [Item ID# 7296]

500 Poring Cards - Dropped by Poring (prt_fild08) [Item ID# 4001]

400 Baphomet Dolls - Dropped by Baphomet (prt_maze03, MVP Arena) [Item ID# 750]


Strength Control Test
[indent=1]
1. Talk to Lord Montagu [ayo_in02 103 167], he will then tell you to look for Sir Lionel
2. Warp to Sir Lionel [caspen 260 270], he will then tell you that you will need to past the Strength Control test.


The Test:
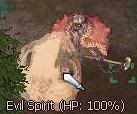
You need to kill 25 Evil Spirits in 5 minutes and 30 seconds, without dying. But there are fake spirits that LOOK the same, but their names are spelled different. If you kill a fake one, you have to restart the test over again. The map will look like the Bossnia map.

Real Spirit name.
Posted Image

Fake Spirit names.
Posted Image

have fun XD

Created by xfoolish (dreamer ro forum)

After finishing the Strength Control Quest, you will then need to kill 400 Hero on PvP Arena (for elite weapon)

Sabado, Nobyembre 10, 2012

Event: Break the Pub - Riddle/Question edition


What: Break the Pub - Riddle Edition
When: Sunday : 3-4 pm (Philippines Time) | be online at 3:00
Where: 2009rwc_03 (@warp 2009rwc_03
How: Simply break the pub by answering the riddle/question. 0.o)

Possible Rewards:
500m bags
Boss cards

Biyernes, Nobyembre 9, 2012

Farming Professionality and Guild Ranks Connection

They saidthat  if you are industrious you can farm up to 200b a week?! is it true? yes if you know all of the farming techniques. Unfortunately AO GM is not industrious. But he definitely knows a lot.


LEGENDARY: RESTRICTED 
LEGENDARY: RESTRICTED
EPIC: RESTRICTED
EPIC: RESTRICTED
EPIC: CASPEN: ST
SUPERIOR: MVP HUNTER
SUPERIOR: BOSSNIA
SUPERIOR: CASPEN RANKING -RG/SINX only
RELIC: BG FARMING
RELIC: GUILD EVENT
RELIC: BOSS HUNTING
ELITE: ZEPH QUEST

Huwebes, Nobyembre 8, 2012

Ragnarok card damage multiplier computation Guide


If cards are of the same type(scripts) they stack. If not they multiply.

Card FACTORS:
Boss/Non Boss x Race x Element x Size.

Boss/Non Boss cards:
Turtle General and Abyssmal Knight Card and Valkyrie Randgris Card


Race:

EG: Hydra Card (20% against demi human race) / Strouf Card (20% against demon)

Element:

Santa Poring Card (20% against shadow)/Orc Skeleton (20% against Holy)

Size:

Minourous Card/Wolf Card/


Example Scripts (from RMS)

TG

Quote
{ bonus2 bAddRace,RC_NonBoss,20; bonus2 bAddRace,RC_Boss,20; bonus3 bAutoSpell,"SM_MAGNUM",10,30; },{},{}
Abysmal

Quote
{ bonus2 bAddRace,RC_Boss,25; },{},{}

Valkyrie Randgris

Quote
{ bonus bUnbreakableWeapon,0; bonus2 bAddRace,RC_NonBoss,10; bonus2 bAddRace,RC_Boss,10; bonus3 bAutoSpell,"SA_DISPELL",1,50; },{},{}

EXAMPLE COMPUTATION: (BEST CARD FOR GX without crit damage multiplier consideration against Baphomet)

Baphomet = BOSS/SHADOW/DEMON/LARGE

Boss/Non Boss
Turtle General/Abysmal/VRc


Race:
2 pcs Strouf Card = 40% 

Element:
Santa Poring Card = 40%

Size:
n/a
Let's try to consider minorous card

2 abysmal 2 TGc + 2 Strouf + 2 SP
1.9*1.4*1.4 = 3.724  

4 abysmmal + 2 Strouf + 2 SP
2*1.4*1.4= 3.92

2 minorous+ 2abysmal + 2 Strouf + 2 SP
1.5*1.3*1.4*1.4 = 3.822 + additional atk of minorous but don't make me compute for it. I suck on math.

3 abysmal 1 minorous + 2 Strouf + 2 SP
1.75*1.15*1.4*1.4 = 3.944 highest 


Down to Basics

Perfect Dodge allows the player to dodge a physical attack  by a chance in % corresponding to the Perfect Dodge Value. ( in the image below perfect dodge = 26%)


Every character starts with a value of 1
Every 10 luk increases perfect dodge
Unlike Flee, PD is not reduced by mob effect. (numbers of mob attacking a player)
Does not work against skills attacks, traps and magic
It overrides potential critical hits.

Dreamer RO Common PD Modifiers.
Death Grimtooth = +15 PD (Battle Ground)
Equinox (GX only) = + 10 PD (Elite Weapon)
Drooping amistir = +10 PD
Lunatic card = + 2 PD
Beer hat = + 5 PD
Lunatic hat  = + 5 PD
Mischievous Ear = + 3 PD (Wing area)
Yoyo card = +10 PD
Choco Card = +10 PD
Valkyrie Manteau (Mage/Archer/Acolyte Class) = + 5 ~ 25 PD (refinement based)
Wild Rose card (thief class only) = +10 PD
Grimtooth = +5 PD
Fortune Sword = +20 PD
Morrigane's Manteau = +8 PD

PD Advantage:
-The best way to avoid RG's most fatal attack - sacrifice 
-The higher your PD the lesser the chance that your enemy's auto skill (eg. sonic blow from punk beanie/dispel/ifrit rings) will trigger. 

Dealing with SACRIFICE/ASURA/ACID DEMO (2nd Job PVP)
> all of them are forced neutral
   Use GR instant 75% reduction.
   Use redux ( demi human damage redux ) cranial (thara from card) / neo valkyrie shield (30%) reduction / redux headgear (35%) -> instant 65% demi human reduction. (NOTE: DEMI HUMAN REDUCTION REDUCE BOTH PHYSICAL AND MAGICAL ATTACKS FROM DEMI HUMAN.)
   Use Aesprika: Note: Neutral is also considered an element in ragnarok.(30% from neutral)
   Use Deviling (not recommended) reason: very risky
  
To be continued


Martes, Nobyembre 6, 2012

MVP Boss Event - Conversion

AO Event Item Conversion/Exchange Rate:


Exchange rate:

LEGENDARY: 10000 pcs = IS - ( yes as if you can)
LEGENDARY 250 pcs = donation wing
L:EGENDARY: 200 pcs = donation headgear
EPIC: 150 pcs = 1 pc boss card (random) [LKC/SinX/HWC]
EPIC: 120 pcs = 1 pc boss card (random) [Thanatos/Kiel/Tao]
EPIC: 100 pcs = 100 boss summon service. ( free 100 boss only for you w/ free bubble gum) 
EPIC: 90 pcs = 400 pcs bapho doll/set  (elite hero quest requirement - cost 4b+)
SUPERIOR: 80 pcs = ???
SUPERIOR: 70 pcs = ???
SUPERIOR: 60 pcs = boss card (random) [TG/VRC/LOD/GR/GTB/MAYA]
SUPERIOR: 50 pcs = 1 billion zeny bag
SUPERIOR: 40 pcs =  Endless Tower Guild Service/ All drops are yours - biotites/cards/SoY
RELIC: 30 pcs =  10 pcs Enriched Elunium
RELIC: 20 pcs =  5 pcs biotite
RELIC: 10 pcs =  1 pc bubble gum
ELITE: 1 pc = 10 pcs poring card ROFL

Where to obtain:
Any guild events. 

Caspen Farming Rotation Guide

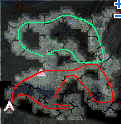
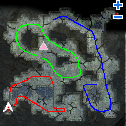
This is for ST hunters. This is the proper rotation for ST hunting.

1. Solo


2. Dual Team

Green Rotation - A
Red Rotation - B


3. Triple Team

Red = A
Green = B
Blue = C


4. Quadruple Team

Green = A
Red = B
Blue= C
Pink = D


Linggo, Nobyembre 4, 2012

Vote For Points


REMOVED

ALWAYS VOTE

RG Farming/Ranking Style

Royal Guard Reflect Type Caspen


Credits To: Sky Princess/Draconie's Guide

Advantage:
Reflect type
Lesser Berry Usage
Fast Kill
5 mins = 1m+ Hero Exp
Flexible Build